Basically it boils down to a serious lack of free time and when I had time to work on my Prusa Mendel, it did not leave me enough time to blog about it.
The good news? Well it's working!!!!!!!
The bad news? Well it took me a long time to finish it :-) For the remainder of the post I'll try to list tips & tricks that were useful to me.
Build weekend
I say the most helpful thing for me to finish this project was going to a RepRap build weekend. This was hosted at the Ghent fablab Timelab. A build weekend has the advantage that you either get to work on your own or someone else his RepRap. It is a place were a lot of people are working on the same thing and thus encounter the same or similar problems. There are also always people present that can provide you with technical help, tips and tricks.In my case, I went there to help build someone else his RepRap. This greatly sped up his build as I was already familiar with the construction of the mechanical parts. On the other hand it, I got stuck during wiring of my RepRap. During the build weekend I got confirmation that the way I wired up everything till that moment was valid and got a heads up on the testing and calibration phases following the wiring of the Prusa Mendel.
Wiring diagram
A big help during the wiring of my RepRap was the following wiring schema:This provides you with all detail required to connect your components to the ramps 1.4 board.
Wiring
Ramps board mounting
One big factor during wiring is deciding where you are going to mount your electronics. In my case, due to the fact that I didn't have a lot of cabling laying around I decided to mount the electronics on top as this causes me to extend the least amount of cables to connect to the ramps board.Basically not such a good idea. As the preferred location for the PLA/ABS spool is .... on top of the prusa mendel. So now it is just plain in the way.
Wires to use
Next, invest in the appropriate wiring to to wire up your components to your board. In a rush to get my RepRap build, I went to a local hardware store and bought a few meters of stereo cable. Although conducting well enough, it caused some connectors to detach themselves as the wires weighed too much.Just the extra effort of looking for 'ramps 1.4 wiring kit' on ebay and some waiting would have saved me a lot of frustration and would have caused me not to end up with a frankenstein build. My next item on my todo list is actually repositioning the arduino with ramps board and rewiring everything using this wiring kit.
Power
You actually need to attach all power connections to the Ramps board. If not you'll spend an entire evening trying to figure out why some parts of your printer work fine while other parts don't.Getting to print
I tried out my printer with some calibration files that I downloaded from the internet. I slice them using Cura and then load the gcode files in Pronterface and print them there.One thing that clearly helped getting a better success to failure ratio is to lower the speed dramatically. Remember, hich speeds might cause your belts to slip, which in turn will cause failed prints.
DIY belt tensioner
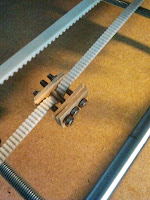
Due to the length of my build and after first usage there seemed to be too much slack on my belts. The belt of my X-axis was no problem as I can easily reach the clamps and adjust them en the tension on the belt. However, the Y-axis was a pain. I am no longer able to reach the clamps and I was not looking forward to unassembling, reassembling and recalibrating the heated print bed. Therefore I decided to employ a belt tensioner. Trying to print one failed twice (due to slack belt) so I decided to put one together myself.Every print an adventure
I must say that till now, each print is an adventure. You get your hopes up after each successfull print, followed by crushed hopes due to a failure on you next print. Never think you are finished tuning this machine.
Double check
Regularly check your printer structure. On 2 occasions I had parts of my printbed and extruder coming slightly apart (no major disasters, but anyway). Some parts of the printer are under a lot of stress or get shaken a lot so trembling can unmake your printer :-)
Previous post regarding my Prusa Mendel Reprap build:
Prusa Mendel RepRap build,day 1
Prusa Mendel RepRap build, day2
Prusa Mendel RepRap build, day 3
Prusa Mendel RepRap build, day 4 & 5
Prusa Mendel RepRap build, day 6
Prusa Mendel RepRap build, day 7
Prusa Mendel RepRap build, day 8

